Crawl space encapsulation is the process of sealing your home’s crawl space with a heavy-duty vapor barrier, airtight vent covers, and a dehumidifier to block moisture, outside air, and pests from entering your home’s foundation.
Homes in our region, the Southeast, experience high humidity. So this is one of the most direct ways to protect your structure, improve indoor air quality, and reduce energy costs.
This blog covers what encapsulation is, how it works, and how to achieve a healthier, more energy-efficient home through your crawl space.
What Is Crawl Space Encapsulation?
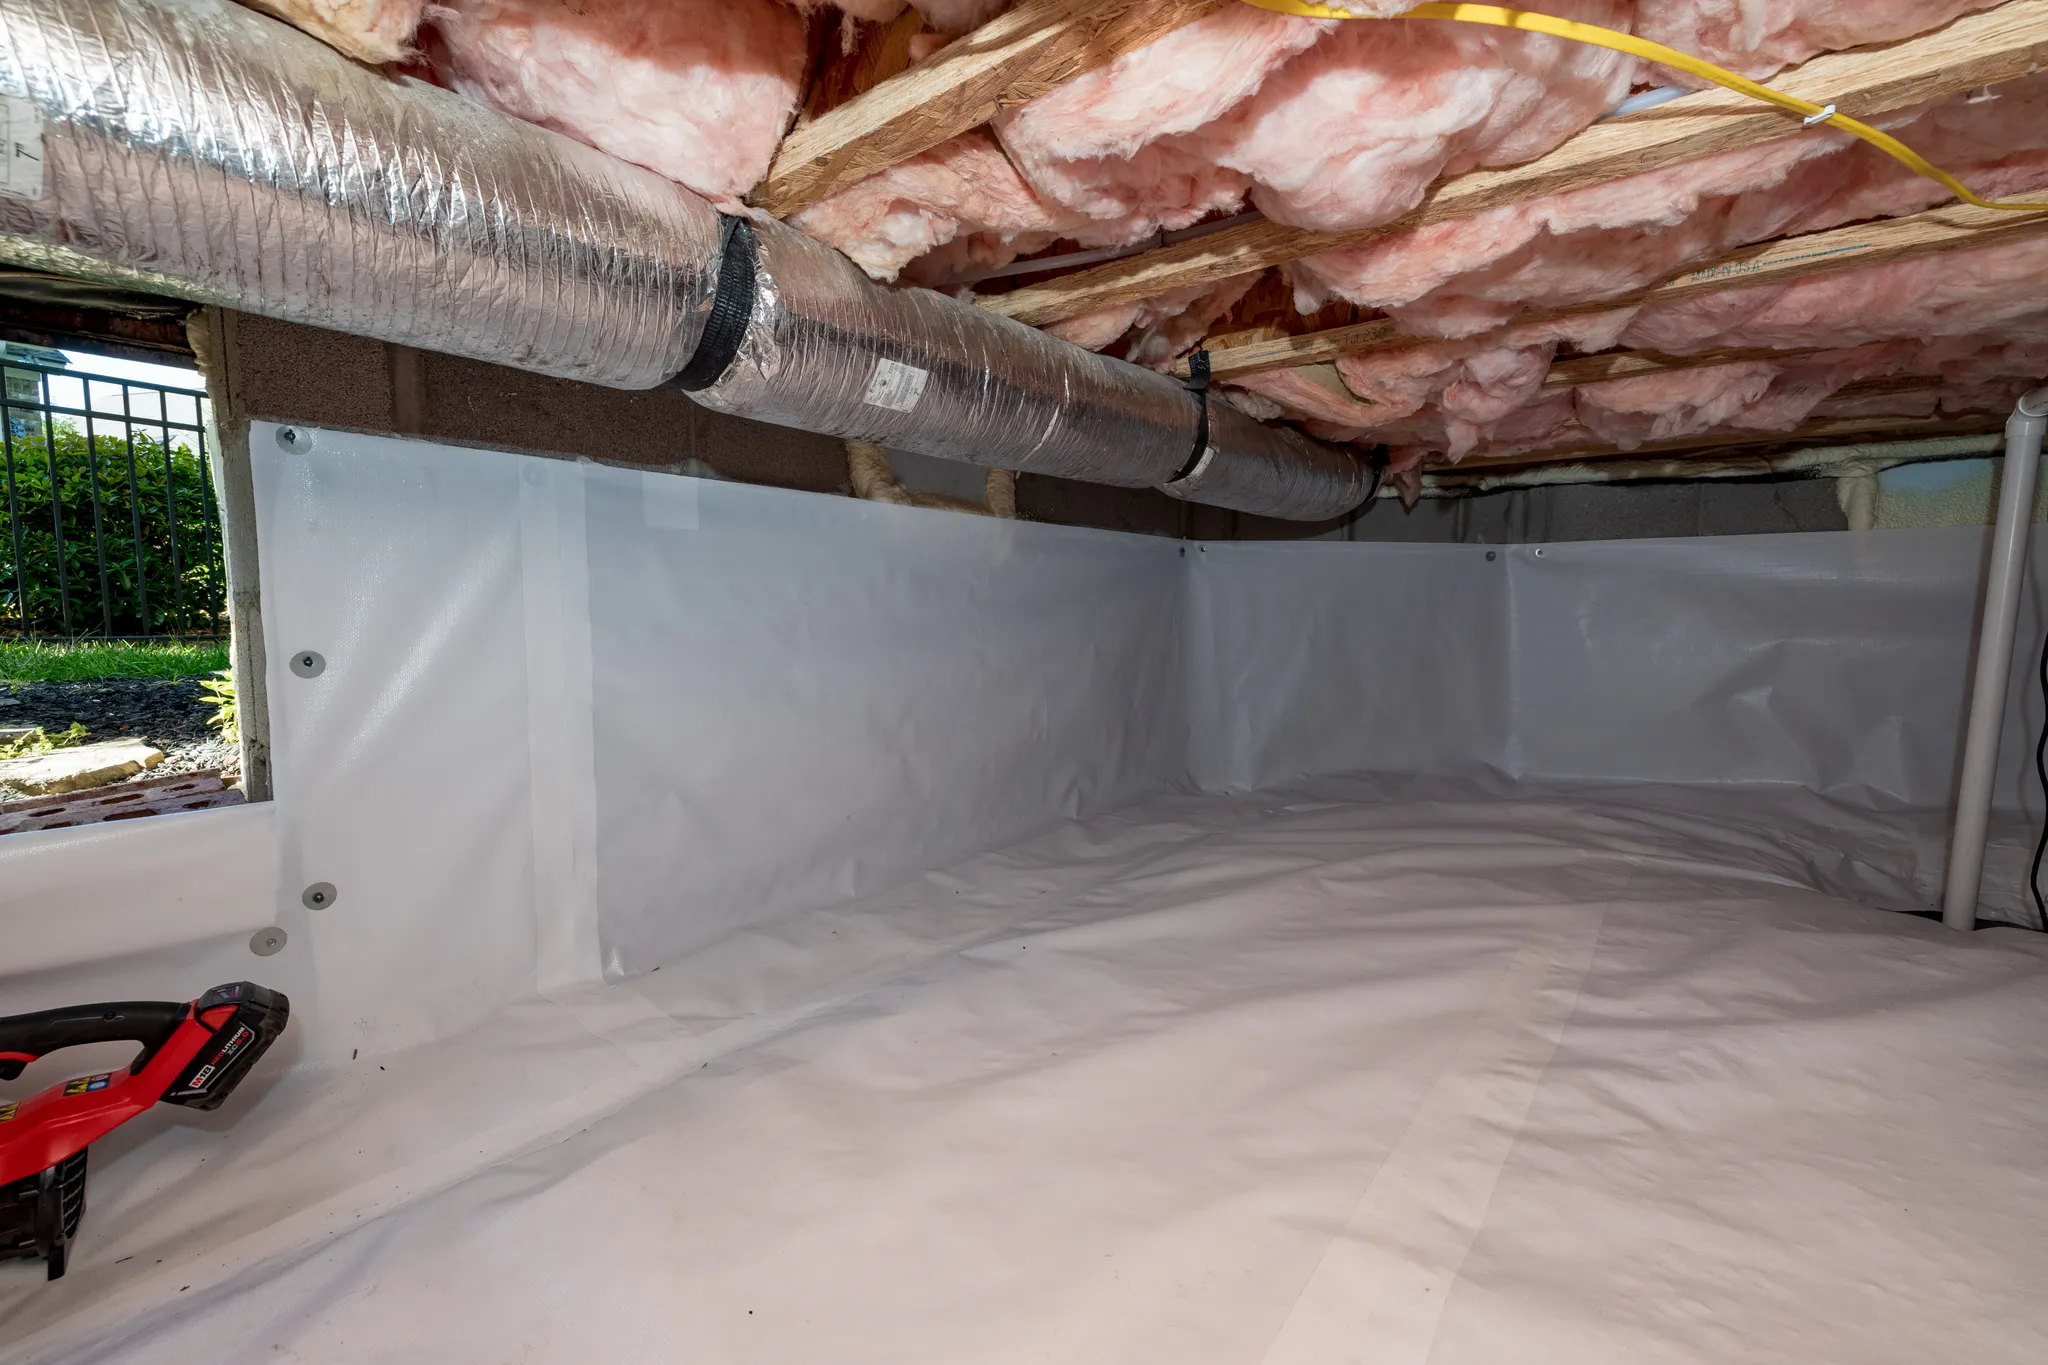
Crawl space encapsulation involves completely sealing the floor and walls of your crawl space with a thick, reinforced plastic liner, airtight vent covers, and an industrial-grade dehumidifier. The result is a conditioned space that’s sealed on all sides, with humidity actively managed so that it doesn’t fluctuate with the weather.
Crawl Space Encapsulation vs. Vapor Barrier
Crawl space encapsulation is different from a basic moisture barrier, which is typically just a thin plastic sheet laid on the ground.
A basic barrier slows moisture vapor coming up through the soil, but it doesn’t seal the walls, doesn’t address outside air coming through vents, and doesn’t control humidity.
A full encapsulation system does all three.
Traditional vented crawl spaces were designed on the assumption that outdoor air circulation would keep things dry, but in humid climates, the opposite happens. Warm, humid outdoor air enters the vents, hits the cooler surfaces inside the crawl space, and condenses.
That condensation feeds mold growth, rots your wood, and can attract pests.
When we install encapsulation, the process starts with a drainage assessment. Any existing standing water or drainage issues have to be addressed before the liner goes in. Otherwise, you’re sealing moisture inside rather than keeping it out.
Benefits of Crawl Space Encapsulation
Crawl space encapsulation protects your home’s structure, improves indoor air quality, lowers energy costs, and extends the lifespan of your HVAC system.
Studies have found that homeowners can recoup more than 96% of their encapsulation costs through energy savings and avoided structural repairs, and the investment supports resale value.
Structural Protection
The floor joists, subfloor, and support beams in your crawl space are load-bearing wood components in direct exposure to whatever conditions exist below your home.
When relative humidity in the crawl space stays above 55%, wood moisture content climbs toward the range where wood-destroying fungi become active.
The damage isn’t always visible from inside the house. Soft or springy floors are usually a late-stage symptom, so it could be too late when you finally notice the damage.
Encapsulation keeps humidity below that threshold by sealing out outside air and actively managing moisture with a dehumidifier.
Air Quality
The “stack effect” causes warm air to rise through your home and exit at higher points, pulling replacement air upward from the crawl space below.
Because of the stack effect, as much as 40-50% of the air on a home’s first floor can originate from the crawl space. That means mold spores, allergens, and VOCs produced by microbial activity travel with that air into your living areas.
Once the crawl space is sealed, that air has nowhere to go but stay put, resulting in better indoor air quality.
HVAC and Mechanical Systems
HVAC ducts running through a humid crawl space tend to gather condensation on the exterior surface, which corrodes joints and connections and degrades the duct insulation. This reduces system efficiency and shortens the equipment’s lifespan.
Once the moisture source is gone, your ductwork stops corroding, and your equipment stops running in conditions it wasn’t designed for.
One of our technicians described it this way:
“I’ve been under houses where the ductwork is sweating so bad it’s dripping. The homeowner’s got the A/C cranked, trying to cool the place down, and half that air is just leaking into the crawl space. Sealing it up makes the whole system work so much more efficiently.”
We can evaluate whether encapsulation alone is enough or whether your home also needs drainage, insulation, plumbing, ductwork, or humidity control.
Return on Investment
Crawl space encapsulation typically returns 60% to 70% of its cost immediately in resale value. In humid or flood-prone regions like the Southeast, that return climbs closer to 100% because buyers actively look for homes with documented moisture protection.
The remaining cost is offset through lower utility bills and avoided repairs:
- Energy savings: According to the Crawlspace Energy Institute, homeowners can see up to a 15% reduction in monthly heating and cooling costs after encapsulation.
- Avoided structural repairs: Wood rot, joist deterioration, and pest damage caused by uncontrolled moisture can cost $3,000 to $15,000 or more to remediate. Encapsulation prevents those costs in the first place.
- Insurance: Some carriers offer premium discounts for encapsulated homes, since the risk of water damage and mold claims is reduced.
When we assess your crawl space, we can give you a clearer picture of what the work would involve, what it’s likely to cost, and what you’d realistically expect to save.
Signs Your Crawl Space Needs Encapsulation
- Musty smells
- Damp or humid crawl space conditions
- Condensation on ductwork or pipes
- Sagging or wet insulation
- Mold or mildew concerns
- Soft or uneven floors
- Pests
- Standing water
- Higher humidity indoors
Homeowners don’t often connect indoor symptoms with the crawl space. Inconsistent warmth throughout the home, high humidity, cold floors, or a musty smell may show up near vents, closets, or lower-level rooms. The source may be underneath the house, and you might never think to check there.
Knowing the signs you need crawl space encapsulation can help you catch the problem before it becomes a structural one.
When Crawl Space Problems Peak
Crawl space moisture problems tend to follow the rain. March through May is when we see the highest call volume for crawl space issues across the Southeast, when ground moisture has the most opportunity to work its way in.
Homes on low-lying ground or with poor yard drainage around the foundation are the most likely to see active moisture intrusion after heavy rainfall.
Scheduling an inspection in late winter gives you the clearest picture of your crawl space’s condition and the most time to address anything before the heaviest rainfall hits.
The Sniff Test
If your home has a persistent earthy, damp smell near floor vents or in lower-level rooms, the “sniff test” can tell you if moisture is already collecting somewhere below.
That odor is caused by microbial volatile organic compounds (MVOCs) produced by mold and mildew. It’s one of the earliest indicators of a crawl space moisture problem, and it shows up long before any visible damage does.
What to Do If You Notice These Signs
These signs don’t always mean encapsulation is the only answer. A plumbing leak, poor drainage, open vents, damaged insulation, or a humidity problem may also be involved. We can inspect the crawl space and help identify the source before recommending the next step.
Since we handle plumbing, HVAC, and other home services under one roof, if the inspection finds something else, we can take care of it without you having to coordinate a separate contractor.
Either way, the inspection gives you a clear picture of what you’re dealing with and whichcrawl space problems need to be addressed first.
The Crawl Space Encapsulation Installation Process
The basic process of encapsulating a crawl space involves:
Assessing the Crawl Space
Before any material goes in, we inspect for standing water, existing drainage issues, damaged insulation, and structural concerns. Any of those conditions need to be addressed first so that the liner doesn’t go in over an active problem.
Cleaning the Crawl Space
The vapor barrier is strong and durable, but rocks and sharp objects can puncture it. Everything gets cleared out before installation begins.
Measuring and Cutting the Barrier Material
The liner needs to overlap correctly at seams and run up the foundation walls with enough material to seal at the top of the foundation wall. The old “measure twice, cut once” rule is useful here, since cutting short means the seams won’t seal properly.
Installing the Vapor Barrier
The liner goes on the foundation walls first, then the floor. Particular attention goes to sealing around floor joists, piers, and anywhere a pipe or duct passes through, since gaps at those points are where moisture finds its way back in and where foundation damage from crawl space moisture typically starts.
Sealing the Vents
Airtight covers go over all foundation vents to stop humid outside air from entering the now-conditioned space.
Installing and Plumbing the Dehumidifier
The unit is sized to the space’s square footage and connected directly to a drain, so it runs continuously without manual emptying.
Our team completes more than 380 of these installations each year. We handle the full scope of the process, including any drainage remediation required before the liner is installed.
The longer a crawl space goes without attention, the more that pre-installation work tends to add up. Poor crawl space maintenance is one of the most common reasons encapsulation projects cost more than homeowners expect.
Crawl Space Dehumidifier Requirements
Crawl space encapsulation requires an industrial-grade dehumidifier, not a residential unit from a hardware store. Without it, the liner alone can’t keep moisture from accumulating.
The dehumidifier helps maintain relative humidity below 55% year-round, which the EPA identifies as the upper limit for indoor spaces. Above that threshold, mold growth, dust mite activity, and wood decay all become active risks.
Residential dehumidifiers aren’t rated for continuous operation. They also have limited capacity for the square footage of most crawl spaces and require manual emptying.
Industrial-grade units run continuously, are plumbed directly to a drain line, and are sized based on the actual square footage and moisture load of the space.
Sizing and installing the right dehumidifier for your crawl space is part of every encapsulation we do. We factor in the square footage, existing moisture load, and drainage setup before specifying a unit, so you’re not left with something undersized or positioned where it can’t drain properly.
Who Provides Crawl Space Services?
Crawl space services should be handled by trained home service professionals who understand moisture control, drainage, insulation, ventilation, plumbing, and how crawl space conditions affect the rest of the home. To be effective, encapsulation needs to be done by professionals with experience across all of those details.
“The inspection is really where it starts. You can’t just show up and start laying liner. You need to know what’s going on down there first. Is there water draining in? Is there already damage? That changes everything about how you approach it.” – Senior Technician
Crawl space encapsulation isn’t a DIY project or a one-person job, and the details matter. We’ve been serving homeowners across the Southeast since 1944, and our crawl space team brings that same whole-home perspective to every inspection and installation.
With more than 14,000 reviews and a 4.8-star rating, the work speaks for itself.
Contact us today to learn how our team can help you protect your home investment, from the crawl space on up.
Crawl Space Encapsulation FAQs
Is it worth encapsulating a crawl space?
Yes, for homes in humid climates, crawl space encapsulation is worth the investment because it improves indoor air quality, lowers heating and cooling costs, and prevents moisture damage to floor joists and other structural components, which can cost $3,000 to $15,000 or more to repair.
What is the average cost to encapsulate a crawl space?
The average cost ranges from $3,000 to $10,000, depending on the size of the space, existing moisture conditions, and materials used. Homes that require drainage remediation before installation will fall toward the higher end of that range.
What is included in crawl space encapsulation?
A complete encapsulation includes a heavy-duty vapor barrier on the floors and walls, airtight covers over all foundation vents, sealing of all penetrations and seams, and an industrial-grade dehumidifier. Some installations also require drainage work or existing mold remediation as a first step.
What can I use instead of crawl space encapsulation?
A basic vapor barrier, improved drainage, or a standalone dehumidifier can each reduce moisture to a degree, but none address all three entry points the way a full encapsulation system does. Partial solutions tend to manage symptoms rather than stopping the underlying moisture source.
When should you not encapsulate a crawl space?
Repairs should precede encapsulation if the crawl space has active water intrusion, structural damage, or significant mold growth. Installing a liner over unresolved drainage problems can trap moisture beneath it. Those conditions need to be corrected first, which is why we always start with an inspection.